

Welcome to the third part of my updated Skinning Guide for FM2018.
Before reading this guide make sure you have read the previous parts of the guide as this part will be following on from them.
The previous guide talked you through creating a new skin, albeit one that is identical in appearance to the default skin, this part will explain how to edit the font and text settings.
Before starting I advise you have the following folder locations open;
- Your 'Working' folder location which is where you extracted the default game files to.
- The 'bbc_skin' folder within your User Data Location. (Or the skin you are working on).
- The Fonts folder for your computer, if replacing the fonts (found at C:\Windows\fonts)
Editing the Fonts
Editing the fonts in FM18 is done in largely the same way it has been since FM15 changed it. The font settings are mainly contained within the various xml files located within the fonts folder for your skin, though some settings are still controlled by the various panel xml files.
The first thing we need to do is to locate the default font files, these will be found in a couple of locations within the file you extracted to your 'Working' folder.
The xml files will be located in the following folder:
\sitoolkit\skins\fm light-widgets\fonts
As we are basing this skin on the light skin we first want to look in the above location, if you are making a skin based on a different default skin (dark or fmc) then look in the widgets folder for that skin first. You will also need to look in the fm-widgets folder as this folder contains the base files as the other folder only contain files that have been edited by those skins but only take the files from the fm-widgets folder if they don't exist in the other folder.
Whilst the font files themselves are located in the following folder:
\sitoolkit_uncompressed\fonts
Note that these locations are slightly different from previous versions as they are now contained within the sitoolkit and sitoolkit_uncompressed fmf files which if you have followed the previous guides you should have already extracted.
When editing the fonts the first thing you need to do is to create a 'fonts' folder within the 'bbc_skin' folder. When done your bbc_skin folder should look like this:

Now there are several ways to edit the fonts depending on what you are wanting to do.
1. The Simple Method - Easiest option but gives the least control.
If you only want to replace the actual font and don't want/need to adjust the sizes or style then you can use this method.
First locate the files for the font you want to use, if it's a common font then it should be located in the Windows Font folder alternatively you can download a font file from the internet.
If downloading a font file then the game prefers truetype fonts (.ttf) but it will read opentype fonts (.otf) fine.
Now you have your font files you next need to copy them into the 'bbc_skin\fonts' folder you just created.
Next you need to rename your font files to match the default fonts used by the game. In the fonts folder you'll notice several font files however the three files that the game uses by default are: proximanova-regular, proximanova-bold, and proximanova-semibold which are the truetype versions, you'll notice the opentype proximanova fonts have slightly different names but these don't seem to be used, whilst the other fonts are to support other languages that use special characters.
Now rename your font files to match those three names, if your font doesn't include the extra bold options just create extra copies of your existing font until you have enough to replace the three files.
In the below example I have replaced the default fonts with the Verdana font:

And this is how it looks in-game:

However as you can see from the screenshot some content is cut-off due to teh character spacing being different in this font.
This method is only really recommended when you are replacing the default font with a similar font, for cases where the font doesn't fit or the sizing is wrong you'll want the second method.
2. The Proper Method - More time consuming but allows full control of the font settings.
This method is a little more complicated however it gives you full control over the size and style of the font and also allows you to have different fonts on different parts of the screen.
First locate the files for the font you want to use, if it's a common font then it should be located in the Windows Font folder alternatively you can download a font file from the internet.
If downloading a font file then the game prefers truetype fonts (.ttf) but it will read opentype fonts (.otf) fine.
Now you have your font files you next need to copy them into the 'bbc_skin\fonts' folder you just created. However this time you don't need to bother renaming the font files.
Next you need to browse to the '\sitoolkit\skins\fm light-widgets\fonts' folder located within your 'Working' folder as this is the location that contains the various xml files we need to edit.
Whilst this folder may look daunting at first most of the settings we want to edit are located within the 'text' xml file, so copy this file to the 'bbc_skin\fonts' folder.
Now open the 'text' xml file you copied over (not the original file, but the copy you always want to edit the copy not the original) with Notepad++.
This file controls the base look of any text in the game assigned to the text spec, it also acts as a base for some other text specs and as such changes made here will affect most of the text in the game, though code from elsewhere can override these settings.
The code we are interested in is near the top of the file:
<string id="file_name" value="proximanova-regular.ttf"/>
<real id="font_size_xxsmall" value="6.7" /> <!-- 9px -->
<real id="font_size_xsmall" value="8.1" /> <!-- 11px -->
<real id="font_size_small" value="8.8" /> <!-- 12px -->
<real id="font_size_normal" value="9.7" /> <!-- 13px -->
<real id="font_size_large" value="11.2" /> <!-- 15px -->
<real id="font_size_xlarge" value="13.7" /> <!-- 18px -->
<real id="font_size_xxlarge" value="16.6" /> <!-- 22px -->
Whilst this file contains a load more code we aren't really interested in that at the moment as that code controls how the game displays special font styles which you shouldn't really need to edit.
The following line determines what font the game uses for any text that uses this file:
<string id="file_name" value="proximanova-regular.ttf"/>
To change the font we just need to change the text that appears under the value part, like we did when renaming our skin.
For example we are going to change the font to display the Times New Roman font.
First we need to locate the Time New Roman font which in Windows is located in C:\Windows\Fonts, once you have located the font copy the file into the 'bbc_skin\fonts' folder and note that the filename of the font is simply called 'times', there are also three other files copied over which are the italic and bold versions and you can safely delete the italic files.
Now we change the above line to read:
<string id="file_name" value="times"/>
Note that there is no need to include the file extension as the game doesn't read that bit so it doesn't matter if you are using otf or ttf files.
There are also two lines further down that you might need to change (though I still don't think they are actually used but it doesn't hurt to change them)
<record style="semi_bold" file_name="fonts/proximanova-semibold.ttf" boldness="0"/>
<record style="bold" file_name="fonts/proximanova-semibold.ttf" boldness="0"/>
You just change these to reference the bold version of the times font (timesbd):
<record style="semi_bold" file_name="fonts/timesbd" boldness="0"/>
<record style="bold" file_name="fonts/timesbd" boldness="0"/>
You'll also notice that these lines include the fonts folder path but the main one didn't, I don't think the fonts/ bit is important but it's safer to just follow how the game lays out the code so you just replace the font name bit.
The next lines control the size of the font, with their being seven sizes though the main three are below:
<real id="font_size_small" value="8.8" /> <!-- 12px -->
<real id="font_size_normal" value="9.7" /> <!-- 13px -->
<real id="font_size_large" value="11.2" /> <!-- 15px -->
To change this you just change the values to suit, though I have no idea what the actual values are referenced against, the comments tell you what they are in pixels but for other values you'd need to play around until you get a size you like.
Now depending on the default skin you based your skin on you may have some more lines below the font sizes:
<integer id="fill_colour_red" value="47" />
<integer id="fill_colour_green" value="49" />
<integer id="fill_colour_blue" value="40" />
<integer id="fill_colour_alpha" value="255" />
Whilst these are present for the fm-widgets and fm dark-widgets skins them seem to be missing from the fm light-widgets skin however they are important as they are the main way to recolour the text so if you are using the light skin as a base like we are here then paste those lines above into your 'text' xml file below the font size lines.
To change the colour you need to adjust the value on each line, valid values range from 0 to 255 with the first three lines adjusting the amount of red, green and blue used, where 255,255,255 is white, 0,0,0 is black, 255,0,0 is red, 0,255,0 is green etc...
Whilst the alpha value affects how transparent the colour is, 255 gives you a solid colour, whilst 0 makes the text transparent, though you shouldn't really need to adjust this.
To change the text colour you need to know the RGB value of the colour you want, the easiest way to get this is from an image editing program.
So load up paint.net, and in the Colors panel at the bottom left click the more buttom to expand the panel and it will now show the RGB value of the selected colour and as you change the colour on the colour wheel you'll see the RGB values change.
For example if I select the top purple colour from the presets at the bottom I get an RGB value of 178,0,255.
So we change the colour values in the xml file to match these:
<integer id="fill_colour_red" value="178" />
<integer id="fill_colour_green" value="0" />
<integer id="fill_colour_blue" value="255" />
<integer id="fill_colour_alpha" value="255" />
Now save the file and if you haven't already load the game and reload/select the BBC Skin in game and note how most of the fonts have changed to Times New Roman and some of the dark text has now turned purple as seen in the below screenshot:
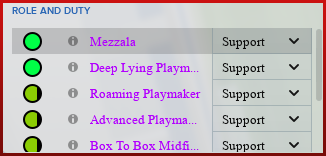
Note however that not all the text fonts have changed to Time New Roman, this is because the font settings for those items are controlledy by different files you also notice through the skin places where the font has changed but the colour of it hasn't this is because the colours for these bits are controlled elsewhere (which we'll explain in the next guide).
To change the other bits you need to first locate the xml file from the fonts folder that controls it and then carry out the same instructions above for that file, for example to change the font in the title to Segoe Print.
First you'd copy the segoe font file to the fonts folder for your skin, then you'd copy over the 'title' xml file and in that file change the file_name value to point to the font file you want to use 'segoepr' in this case and in that file you can also change the default title font sizes and colour though you'll notice not every bit will read these changes - changing the font sizes will affect the subheadings but not the titlebar, whilst changing the colours won't affect the titles on the player screen as these settings are controlled elsewhere for this screen.
One thing you can do is remove the all caps option if you want and this is done by just deleting this line from the file:
<string id="capitalisation" value="upper case" />
Which after playing around with those settings can give you something that looks like this:

It's then just a case of going through the various files in the fonts folder until you have replaced everything you want.
To undo any of the changes you have made you can either undo the code changes you made in the xml files by following the above instructions in reverse.
Though an easier way to remove all your changes made to a file is to just delete the file you added to your skin and then when you reload the skin the game will revert to using the default files.
If you have any questions then the best place to ask them is in the Skinning Forums at the Official SIGames Forums where I can be found most days.
If you like my work then feel free to send me a donation this is completely optional all of my content is and will always be free to access.
---
Redistribution Terms
You are free to post this content to your website provided:
1. It is not sold or behind a paywall.
2. You don't advertise it as being exclusive to your website.
3. My username and blog address are included: http://michaeltmurrayuk.blogspot.co.uk/