Welcome to my Football Manager Blog, the main purpose of this blog is to provide updates on the status of my Football Manager Skins & Guides Website

If you have any questions or queries then I can generally be found in the Skinning Forum at the Official Sports Interactive Forums, though I'd ask you to open a new thread rather than sending me a message.

To help with navigation I have included indexes of my content for the last few versions of Football Manager in the tabs below.

Wednesday 16 December 2015

Football Manager 2016 Patch 16.2 Released


Today saw the release of Patch 16.2 for Football Manager 2016 which is the second main patch for FM16 and fixes various issues.

However the patch may cause the game to crash when pressing continue if you are using one of a number of custom skins (the problem doesn't affect the Base Skins or any of my other Mods).

 To fix the problem:

- End users if you don't want to wait for the skinner to release an updated version of the skin then just delete the 'game processing panel.xml' file located in the panels\game folder for the skin you are using (or follow the instructions below to alter the problem line in that file). Then in preferences turn off the skin cache if it is on and reload your skin and the game should stop crashing.

- For skinners you will need to redo any changes you made to the default 'game processing panel.xml' file in the file that was updated by the patch (note the updated file is located in the main panels.fmf file not one found in the updates folder), though you really should be checking and updating all of your xml files for any changes made in the patch.

Looks like the following line in that file has been changed from:

<record id="widget_properties" class="calendar_detailed_event_panel" file="game/calendar dropdown event panel" show_no_events_label="false" width="200">


To:

<record id="widget_properties" class="calendar_popup_day_panel" file="game/calendar dropdown day panel" show_no_events_label="false" width="200"> 

Updating the class and file values on that line to their post-patch versions should solve the crashing problem.

However this will only fix the problem with the game crashing when it tries to process time, if your skin or game is crashing in other places or has other problems post-patch then if you are an end user first try manually deleting your cache files (if you do not now how to do this please see this thread and look under the How To Section for your OS) if that doesn't work then you'll need to wait for the skinner to release an updated version of the skin. 

If you are a skinner than as normal you will need to check each of the files you have included in your skin (which is why you should really only include files you have modified in your skins) to see if they were updated by the patch and then update your files so they reflect the changes made in the patch.

Wednesday 9 December 2015

FM16 MOD - Kit Titlebar Colours Mod


Football Manager 2016 introduced a new method of recolouring the titlebar, which simplfied the code and made it possible to recolour more of the skin, however one of the other things this new method did was apply a contrast check to the colours to make them more readable, however some people prefer the teams to use their original proper kit colours in the titlebar.

This is what this mod does it replaces the new contrast checking recolouring code with the old style pure recolouring code.

Note: Whilst this mod removes the contrast check which will result in the colours of some teams changing, it won't set all teams to their 'real' colours it will only set them to the colours declared in the database, so whilst it will change the shade of blue used for Barcelona it won't set their text colour to red, as the database has them set to yellow.

However not all parts of the game support the old recolouring code so this isn't a perfect replacement, the two main areas the old code isn't supported on are:

- The Match Screens.
- The Actionbar text.

Screenshots
(Top part of image is default skin, bottom part this mod)


I've also tweaked the size of the back/forward arrows as in the default skin the back arrow is bigger, which doesn't look right when the recolouring has been removed from them.


 ---
Redistribution Terms
You are free to post this content to your website provided:
1. It is not sold or behind a paywall.
2. You don't advertise it as being exclusive to your website.
3. My username and blog address are included: http://michaeltmurrayuk.blogspot.co.uk/

Friday 4 December 2015

FM16 Guide - How To Recolour the Star Ratings


Like in previous versions it is possible to change either the appearance or the colour of the Star Ratings used in FM16, however the method to recolour them has changed in Football Manager 2016.


How to Recolour the Star Ratings

In Football Manager 2016 the colour of the star ratings is no longer set by the actual graphic, like the other skin graphics in the game the colours are now set by values declared in the settings file for the skin, the advantage of this is it makes it a whole lot easier and quicker to recolour the stars.

If you are using one of the Default Skins then you will first need to download and switch over to the relevant Base Skin.

Then inside the folder for the skin you are using should be a settings folder and inside this should be an xml file (ignore the one called config.xml the one you want will generally be called something like settings.xml, colours.xml or '<skin_name> settings.xml')

Now inside that xml file you want to locate the following lines of code:

<colour name="star rating senior" red="244" green="188" blue="0"/>
<colour name="star rating youth" red="183" green="188" blue="191"/>
<colour name="star rating unknown" red="28" green="28" blue="29"/>
<colour name="star rating empty" red="202" green="202" blue="202"/>

(Don't worry if these lines aren't present in the file for your skin as the skinner may not have included them, if that is the case just paste the above lines into the file).

These four lines of code control the colour fo the Star Ratings, the first line controls the Senior Star (Gold by default), the next line controls the Youth Star (Light Grey), the third line controls the Unknown Star (Black) and the final line controls the Empty Star (Dark Grey).

To adjust the colour you need to change the values for each component. Valid values range from 0 to 255, where 255,255,255 is white, 0,0,0 is black, 255,0,0 is red, 0,255,0 is green etc…

Next you need to know the RGB value of the colour you want, the easiest way to get this is from an image editing program. (Or you can use trial and error to get close to what you want, one thing I would suggest is avoid setting values to 255 as they can be a bit bright, using 248 or 240 tends to give a softer colour that looks better).

For example if you load up paint.net, and in the Colors panel at the bottom left click the more button to expand the panel and it will now show the RGB value of the selected colour and as you change the colour on the colour wheel you'll see the RGB values change.

Alternatively there is a colour picker included within the game – just go to Preferences -> Interface -> Skin Colours, then click on one of the existing colours and a colour selector pops up where you can select a colour and get its RGB value.

Then it is just a case of picking the colour values that you want.

Below I have included some example colours for you to use if you want.

To get these into the game all you need to do is to paste the following lines for the colour scheme you want to use into the settings file for your skin in place of the existing lines of code for the star ratings you want to replace, if the skin you are using doesn't already have a star rating colours set in the settings file then you can just paste these lines directly into the file.
NOTE: If you are using one of the default skins you will need to download and switch to the relevant Base Skin to change the star colours.

After you have pasted in the lines you want, load up the game and if you have the skin cache on turn it off from within the Preferences Menu and Reload your skin for the new colours to be read.


RED
<colour name="star rating senior" red="200" green="30" blue="40"/>
<colour name="star rating youth" red="220" green="175" blue="175"/>
<colour name="star rating unknown" red="100" green="30" blue="40"/>
<colour name="star rating empty" red="202" green="202" blue="202"/>


BLUE
<colour name="star rating senior" red="72" green="145" blue="220"/>
<colour name="star rating youth" red="175" green="192" blue="222"/>
<colour name="star rating unknown" red="0" green="32" blue="114"/>
<colour name="star rating empty" red="202" green="202" blue="202"/>


GREEN
<colour name="star rating senior" red="53" green="178" blue="96"/>
<colour name="star rating youth" red="175" green="220" blue="175"/>
<colour name="star rating unknown" red="0" green="73" blue="36"/>
<colour name="star rating empty" red="202" green="202" blue="202"/>


How To Change the Star Rating Images

NOTE: These instructions are for people who want to create their own new star images, if you are using a downloaded pack then follow the instructions included with them to install them.

Whilst the method to recolour the star ratings has changed it is still possible to replace the default stars with different images.

The first thing you will need to do is to extract the default Star Rating graphics which can be found in the following location within the skins.fmf file:

\skins\fm-widgets\graphics\icons\custom\star rating

Inside that folder will be three subfolders;

scouting - I don't think these are actually used any longer.

senior - controls the main star ratings. (also used for reputation stars).

youth - controls the youth star ratings.

Inside each of these folders you will notice several png graphics and an xml file for each of them.

The png files control the actual appearance of the stars and note that we no longer have images for each rating we just have one for each part, so for example a two star rating would use two full images and three empty ones, whilst a three star rating would use three full images and two empty images, when in the past you'd have had a unique image for the two star rating and another one for the three star rating.

The other thing to consider when making new star images is that you can only use the three colours (red, green and blue) used by the default files as the game will recolour these to the colours declared in the settings file.

By default the red colour is assigned to the known star, the green colour is assigned the unknown star and the blue is assigned to the empty star.

Regarding the xml files you shouldn't need to edit these as they just tell the game what colour names to assign the red/green/blue colours to, and whilst you can change what values these are assigned to it is best to just leave them assigned to the default values to save any confusion at a later date.
 
---
Redistribution Terms
You are free to post this content to your website provided:
1. It is not sold or behind a paywall.
2. You don't advertise it as being exclusive to your website.
3. My username and blog address are included: http://michaeltmurrayuk.blogspot.co.uk/

Thursday 3 December 2015

FM16 Guide - How To Customize Match Player Ratings Screens

 
Like in previous versions Football Manager 2016 allows you to customize what information is displayed on the various Player Rating screens shown on the Match Screens.

However the coding for this has changed slightly in FM16 so now is a good time to create a proper guide showing you how to edit these screens.

Monday 30 November 2015

FM16 Match In Between Highlights Mod Updated


My Match In Between Highlights Mod has been updated to Version 1.1

This is a minor update to fix a problem with the players on the team stats page sometimes disappearing in the second half.

For full details and download links for each version follow the below link:


FM16 Match in Between Highlights Mod Download Page


---
Redistribution Terms
You are free to post this content to your website provided:
1. It is not sold or behind a paywall.
2. You don't advertise it as being exclusive to your website.
3. My username and blog address are included: http://michaeltmurrayuk.blogspot.co.uk/

Thursday 19 November 2015

FM16 Match Screen Kits Mod


My latest Match Screen Mod for Football Manager 2016 is another update from FM15 with this one changing the logos on the match screens into kits, and is available in two versions:

Mod 1 - Replaces all Match Screen Logos with Kits this affects Logos shown on the Split Screen Overview Panel and in the Header.

Mod 2 - Just replaces the Logos with Kits on the Split Screen Overview Panel but leaves the Logos in the Header.

You can also get the teamnames to appear on the titlebar (third screenshot below) by downloading Mod 1 of this mod and my Match Titlebar Team Name Mod.


Mod 1 should worth with any FM16 skin including Touch mode skins.

Mod 2 should also work with any FM16 full-mode skin, though if you are using a skin with a custom match titlebar you'll need to modify the files yourself.

If you are using a Touch Mode Skin then just download Mod 1 as the extra file in Mod 2 isn't used in FMT.

Note that these mods don't add kits/logos to the various Overview screens that don't display logos by default it just changes the existing logos to kits.

---
Redistribution Terms
You are free to post this content to your website provided:
1. It is not sold or behind a paywall.
2. You don't advertise it as being exclusive to your website.
3. My username and blog address are included: http://michaeltmurrayuk.blogspot.co.uk/

FM16 Match Titlebar Team Names Mod


This is a simple mod that restores the Team Names to the Match Titlebar in Football Manager 2016, and you have two options:

Team Names and Logos:


Team Names and Logos, plus a Competition Logo:


They are designed to work on skins based on the Default FM16 skins, for skins that have a different match titlebar from the default you'll need to modify the files yourself. NOTE: These won't work in FMT mode skins as they don't use this panel.

If you are playing on a smaller resolution certain options on the action bar might be cut off at certain points, however these items just appear in the drop down menu like the first screenshot (which was taken at 1024x768) meaning they are still available to select.
 
Also Note if the Skin you are using already has a 'match title bar.xml' file you'll need to follow the advanced instructions further down to create the mod on your own as overwriting your skins custom match titlebar may cause problems.
 

---
Redistribution Terms
You are free to post this content to your website provided:
1. It is not sold or behind a paywall.
2. You don't advertise it as being exclusive to your website.
3. My username and blog address are included: http://michaeltmurrayuk.blogspot.co.uk/

Tuesday 17 November 2015

FMT16 Scoreboard Logos Mod


This is a simple mod that restores the club logos to the Scoreboard on the Match Pitch view in Football Manager 2016, aswell as adding a Competition logo.


That is designed to work on skins based on the Default FM16 skins, for skins that have a different match scoreboard from the default you'll need to modify the files yourself. (full instructions are provided at the below link)

Note if the Skin you are using already has a 'match title bar score.xml' file you'll need to follow the advanced instructions further down to create the mod on your own as overwriting your skins custom scoreboard may cause problems.


---
Redistribution Terms
You are free to post this content to your website provided:
1. It is not sold or behind a paywall.
2. You don't advertise it as being exclusive to your website.
3. My username and blog address are included: http://michaeltmurrayuk.blogspot.co.uk/

FM16 Scoreboard Logos Mod

This is a simple mod that restores the club logos to the Scoreboard on the Match Pitch view in Football Manager 2016, aswell as adding a Competition logo.


That is designed to work on skins based on the Default FM16 skins, for skins that have a different match scoreboard from the default you'll need to modify the files yourself. (full instructions are provided at the below link)

Note if the Skin you are using already has a 'match title bar score.xml' file you'll need to follow the advanced instructions further down to create the mod on your own as overwriting your skins custom scoreboard may cause problems.


---
Redistribution Terms
You are free to post this content to your website provided:
1. It is not sold or behind a paywall.
2. You don't advertise it as being exclusive to your website.
3. My username and blog address are included: http://michaeltmurrayuk.blogspot.co.uk/

FM16 Match In-Between Highlights Mods


Like the last couple of versions the match screen we have in Football Manager 2016 is a hybrid TV-Classic view mode where again if there are no hightlights you are left on the pitch view instead of switching back to the last panel you were on, were we are left with a small pop-up giving us some information like the old TV-View widgets.

The default FM16 panel has been improved slightly but is still rather limited especially if you are using a larger resolution.

As with Football Manager 2015 I have modified the panel to use the adaptive panels used elsewhere in the game this means the panel will  resize itself depending on what resolution you are using (meaning no editing of the xml file just to get it working) and will also display extra panels if you have the space.

This year there are two versions for each mode of FM2016 (Full Mode and Touch Mode) rather than being two for each skin this is because there are eight default skins this year, which would take a lot of extra work to create individual mods for each skin.

Normal - Maximizes the size of the in-between match highlights panel positioned in the centre of the screen and leaving space for the match feed notifications down the right. (For the FMC version some of the match feed overlays the panel even in this mode as the feed takes up more room in FMC mode).

Wide - Maximizes the size of the in-between match highlights panel, but this time uses up the full width of the screen, this allows for more information to be shown at smaller screen resolutions, but the match feed items when displayed will cover parts of the top right side of the panel.

Outside of the match screen these mods make no changes.

New views for FM16:

- Both Formations Vertical View - I've added a new option for the both formations panel to show the formations top to bottom rather than side-by-side.

- Pro-Zone Shots View - This is a new default view introduced in FM16, it acts like the Action Zones view put shows shots rather than possession, I've added a right click function to this view to allow you to pick either a horizontal or vertical pitch, though I haven't found a way to add more stats to the panel.

Advanced instructions are also available to apply them to other skins and to enable alternative views.

Screenshots show a sample of available views and the panel at different resolutions, each version has the same views and panels enabled.


FM16 Match Highlights Mod Screenshots


FM16 Match Highlights Wide Mod Screenshots


FMTOUCH16 Match Highlights Mod Screenshots


FMTOUCH16 Match Highlights Wide Mod Screenshots


For full details and download links for each version follow the below link:

FM16 Match in Between Highlights Mods Download Page


Saturday 14 November 2015

FM16 Guide - How To Stop the Blurring Effect


A new feature in Football Manager 2016 is a blurring effect that displays when the main screen isn't in focus (i.e. when processing, saving or responding to a popup), however if you don't like this effect then it is simple enough to disable.

The first thing you need to do is extract a couple of the default game files, if you don't know how to do this see this guide.

If you are using a Full Mode Skin then you want to extract the contents of this folder:

\skins\fm-widgets\graphics\boxes\dialog\background

If you are using one of the Touch Mode Skins then you want to extract the contents of this folder:

\skins\fmc\graphics\boxes\dialog\background

If you are using the default skins then you can download the relevant Base Skin which saves you having to extract the files as I have included them with the Base Skins.

Inside these folders will be a paper.xml file if you open this you will see the following line:

<boolean id="blurred" value="true"/>

To disable the blurring all you need to do is change true to false:

<boolean id="blurred" value="false"/>

Then save the file and if FM16 is running reload your skin and the blurring should now be gone.


On the left is an example of the blur enabled as default whilst the right image is with the blurring disabled.

---
Redistribution Terms

You are free to post this content to your website provided:

1. It is not sold or behind a paywall.
2. You don't advertise it as being exclusive to your website.
3. My username and blog address are included: http://michaeltmurrayuk.blogspot.co.uk/

Football Manager 2016 Base Skins Released


As with recent Football Managers to make certain changes in Football Manager 2016 you are required to add files to the skin folders, whilst this isn't a problem for fan-made skins it is a slight problem if you are using the Default Skins included with the game. So to help people out I have again made some Base Skins for FM2016 that allow you to add and modify the default skins without breaking your game.
Full instructions on when and how to use the Base Skins can be found on the download page, please ensure you read the page in detail before downloading the Base Skins as it will save you problems in the future. 


Currently there are eight versions of the Base Skin - a Dark and Light one for both the Full Mode and Touch Modes of FM2016, as well as a Retro Touch Skin, and then three more versions of the FMT skins that are designed to work better with Touchscreens.
If you have any further questions on the Base Skins please ask any questions in the Skinning Hideout on the Official SIGames Forums.

---
Redistribution Terms
You are free to post this content to your website provided:
1. It is not sold or behind a paywall.
2. You don't advertise it as being exclusive to your website.
3. My username and blog address are included: http://michaeltmurrayuk.blogspot.co.uk/

Friday 30 October 2015

Football Manager 2016: How to Add Custom Trophy Images


A new feature for FM2016 is the ability to assign custom trophy images to actual competitions.

Like with faces, kits and logos to add trophies to the game you need an image graphic of your trophy and a config xml file.


How to Create the Trophy Graphic


The style of graphic used for the trophy doesn't really matter, (no doubt graphic makers will soon make various different styles for you to choose from) the licensed images included with the game use cut-out style images (like the player faces), if you want some instructions on how to create cut-out images then you can have a look at this old guide I made for player faces.

When creating the graphic the best thing to do is to try and obtain the largest and cleanest image you can as they are the easiest to work from.

The dimensions of the final image aren't that important as like with the other graphics the game now scales them to the size it needs.

The default images are 180x180 pixels, however if you can I'd make them bigger say 360x360 pixels so they are upscaled better if someone is playing zoomed in or a skinner makes them appear larger in the skins.

When saving your images you want to save them as png files with transparency enabled if an option.

Filenames are up to you but it is best to avoid non-english characters, special characters, captial letters or spaces. The easiest thing to do is to name them by their competitions id as that will also make creating the config files easier.


The Config Entry


The entry you need to add to your config file is as follows:

<record from ="<FILE_NAME>" to="graphics/pictures/comp/<UNIQUE_ID>/trophy"/>

Where;

<FILE_NAME> is the name of the graphic you are adding.
<UNIQUE_ID> is the in-game id of the competition you want to link the image to. This is the same ID you would use if adding a logo to the competition.

For example the below line would link a graphic called 'prem' to the English Premier League trophy:

<record from ="prem" to="graphics/pictures/comp/11/trophy"/>

If you haven't created a config file before then have a read of this guide.


Where To Place Your Image


Trophy images are placed in the same place as your kits, logos and faces. They should be placed inside the graphics folder within your User Data Location, provided they are inside your graphics folder and are in the same folder as the config file you can freely place them in as many subfolders as you like (for example graphics\trophies\europe\england would work).

Unless you have changed it your User Data Location will be located in one of the following places:

Windows

C:\Users\[Your Windows Username]\Documents\Sports Interactive\Football Manager 2016\

Mac

/Users/[Your Mac Username]/Documents/Sports Interactive/Football Manager 2016/

Linux

/home/documents/Sports Interactive/FM2016/

Then load the game and from the Preferences -> Interface menu untick 'Use caching to decrease page loading times' and tick 'Reload skin when confirming changes in Preferences' Then click Confirm and if done right your trophy images should display. (Once they are displaying you can undo this step)

Below is an example where I have assigned the FM2016 logo to appear as the trophy for the English Premier League:


---
Redistribution Terms

You are free to post this content to your website provided:

1. It is not sold or behind a paywall.
2. You don't advertise it as being exclusive to your website.
3. My username and blog address are included: http://michaeltmurrayuk.blogspot.co.uk/

Thursday 29 October 2015

Football Manager 2016 - Locating and Changing your User Data Location


If you have played the Football Manager 2016 Beta you may have noticed that the Preferences menu no longer lists or allows you to change your User Data (Saving) Location, this feature was removed from the game because it was confusing people.

Your User Data (Saving) Location is the place on your hard drive where user generated content is stored, this includes data generated by the game such as save games, tactics and shortlists. It also includes graphics (kits, logos, faces etc) and skins that you may have downloaded or created.

Locating Your User Data Location

Your User Data Location will be found in one of the following locations depending on which Operating System your computer is using:

Windows

C:\Users\[Your Windows Username]\Documents\Sports Interactive\Football Manager 2016\

Mac

/Users/[Your Mac Username]/Documents/Sports Interactive/Football Manager 2016/

Linux

/home/documents/Sports Interactive/FM2016/

Once you have located your User Data Location the process for installing skins and graphics is the same as previous versions, however this time around the game should create the graphics and skins subfolders for you to make things slightly easier. 


How To Change Your User Data Location

Even though the ability to change your User Data Location from within the game has been removed it is still possible to manually change it's location.
(NOTE: You only need to follow the below instructions if you want to move the location, these instructions aren't needed to just add content to the game if you want to just use the default location)

In FM2016 you now need to add a command line to the game launch options.

To do this follow the instructions below:

- Go into Steam -> Library -> Games view.
- Located Football Manager 2016 and right-click on the game.
- Select 'Properties'
- Click 'Set Launch Options...'
- Copy the following into the dialogue box: --user_data_location="<path>"
- In the <path> section, enter the exact path you wish the folder to be generated (ie D:\Users\ etc)

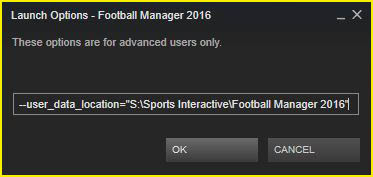
So for example if you wanted your Saving Location to be S:\Sports Interactive\Football Manager 2016

You would add the following text to the dialogue box:

--user_data_location="S:\Sports Interactive\Football Manager 2016"

So your Launch Options box should look something like this:


Note that this folder location needs to already exist on your hard drive before setting the launch option, then when you next launch FM2016 the game will automatically generate the needed subfolders (such as graphics, games and skins).

If done correctly the contents of your custom User Data Location should look something like this after having run the game with the launch option set:


Also note that if you have any already created anything in game with the default location set (such as save games, shortlists, or tactics) you will need to manually copy the items over to your new location.

To reset your Saving Location to the default position you just need to delete the command line and on your next restart of FM16 the game will go back to using the default location. (Again you'll need to maunaly copy over any existing files from your old custom location to the default location for them to be read by the game).

Wednesday 28 October 2015

Football Manager 2016 Beta Released


The Pre-Release Beta of Football Manager 2016 has now been released to those of you who have pre-ordered a digital copy from the selected retailers. 

I am in the process of checking what has been changed from a skinning, modding and graphics point in FM2016 and should have some information out over the next few days.

For the moment the most up-to-date information can be found in the Skinning Forum on the Official Sports Interactive Forums.

From a quick look it looks like logos, kits and player faces all haven't changed and as such you should still be able to use last year graphics.

Skins as always won't work and you will have to wait for the skin makers to update or release new skins.

Sunday 25 October 2015

Football Manager 2015 Skinning Guide Part 5: Editing the xml files


Welcome to the fifth part of my updated Skinning Guide for FM2015.

Before reading this guide make sure you have read the previous parts of the guide as well as the extracting files guide, as this guide will assume you have followed those guides.

The previous parts of the guide talked you through creating a new skin, changing the fonts, changing some of the font settings and colours, with the last part detailing how to change the skin graphics.

This part of the guide will talk you through some of the basics of how the xml files work. Due to how Football Manager works it isn't possible to give you a full guide on how to edit the xml files however this guide should give you some basic information to get you started. I also have some more detailed posts on this forum/my website that talk you through modifying certain screens and if you combine those guides with the basics learned here you should get a good understanding of how the xml coding in Football Manager works, after that the best way to learn is just from the experience of looking through and editing the xml files.

Editing the xml files is fairly simple once you know where to start and as such it doesn't actually require any coding experience, though some very very basic knowledge of coding or even webpage editing will give you a quicker start (even the simple knowledge of how to manually format your posts when posting on the forum is all you really need to start with).

You should also only rarely need to actually write your own xml code, most if not all of your xml editing will involve copying code from one place/file to another to change where it displays or will involve deleting of some code if you want to hide certain things, so you mainly need to know how the code links together and what is part of the same code. The hardest thing you'll probably have to do is to adjust the code you copied so it matches the format of the existing code as the code can change slightly depending on where and how it's displayed.

Before starting I advise you have the following folder locations open:

-          Your 'Working' Folder Location from the previous guide (which is where you extracted the default game files to).
-          The my_first_skin folder within your Saving Location.

You will also need to have your preferred xml file editor open as well as FM2015.

Wednesday 21 October 2015

Football Manager 2016 Release Date Announced


Bit of a late announcement but if you haven't heard Football Manager 2016 is due for release on 13th November 2015 with a pre-release Beta available around two weeks before release to people who pre-order the digital version from select retailers.

The plan at the moment is to try and get my mods, skins and guides up dated for FM2016 over the full release weekend, though exact timing will depend on how much needs updating. I am not planning on releasing anything during the Beta period as I don't know when or if I'll have access to it and things may change between the beta and release meaning the work would need to be redone anyway. 

I should also over this weekend have finished the latest part of my FM2015 Skinning Guide, which should leave me time to get another one or two parts done if needed before FM16 is out, and then it is a case of updating it all for FM16.

Saturday 29 August 2015

FM2015 Skinning Guide Part 4: Editing the Skin Graphics


Welcome to the fourth part of my updated Skinning Guide for FM2015.

Before reading this guide make sure you have read the previous parts of the guide as well as the extracting files guide, as this guide will assume you have followed those guides.
The previous parts of the guide talked you through creating a new skin and then changing the fonts and some of the font settings, before telling you how to change most of the text colour.

This part of the guide will talk you through how to change the appearance of the actual skin graphics.
As it is fairly long I have also included a quick recap at the end.

Before starting I advise you have the following folder locations open:

-          Your 'Working' Folder Location from the previous guide (which is where you extracted the default game files to).
-          The my_first_skin folder within your Saving Location.

You will also need to have your preferred xml file editor and image editing programs open as well as FM2015.