

Welcome to the new and improved Football Manager Skins and Graphics Installation Guide.
This part of the guide will show you how to install skins correctly into Football Manager.
For Instructions on how to Install Graphics then please refer to this Guide.
I've tweaked the format this year to try and make it as simple as possible.
First note that these instructions only apply to the Steam version of the game (whether it's a boxed copy, a CD-Key or purchased through Steam) and the instructions are generally the same regardless of your OS or whether it is the Full Mode or Touch Version you are playing and any differences will be noted in the instructions.
Please note you are advised as always to run a virus scan on any file downloaded from the internet.
It is also advisable to read any instructions on the download page for the content you are installing (or found in the readme that comes with the download) as they may contain any extra instructions that are specific to that file.
It is also advisable to read any instructions on the download page for the content you are installing (or found in the readme that comes with the download) as they may contain any extra instructions that are specific to that file.
How To Install Skins
This part of the guide will cover how to install skins, first note that skins will only work on the version of the game they are designed for (so FM19 skins will only work with FM19 and not FM18) and Touch and Full Mode skins aren't compatible so if you are using the Touch version you will only be able to use Touch skins.
After you have downloaded a file it will generally come in one of three formats: zip, rar or 7z file.
Zip files should be automatically supported by your OS and may show up as compressed folders, Rar and 7z files may require you to download some software to extract the files, the below software is reccommended:
Displaying Skins in-game
Skins: To select the skin in game you will need to load the game, and go into the Preferences menu and on the left panel in the middle you should have an option called Skin with a drop-down menu next to it.
If you select the drop-down menu it should list all of the skins you have installed, if the skin you want is listed then just select it and press the Confirm button to load it.
If the skin you want isn't showing then go to the Preferences -> Interface menu and at the bottom left you'll see another drop-down menu to select your skin from, below this menu untick 'Use Caching to decrease page loading times' and tick 'Reload Skin when confirming changes in Preferences' then select Confirm. This should then take you out of the Preferences menu but if you re-enter it should have refreshed the list of skins and your skin should now be in the above list.
If done right the screen should look like this:
Once the skin is loaded you can turn the skin cache back on and un-tick the Always Reload button.
Redistribution Terms
You are free to post this content to your website provided:
1. It is not sold or behind a paywall.
2. You don't advertise it as being exclusive to your website.
3. My username and blog address are included: http://michaeltmurrayuk.blogspot.co.uk
This part of the guide will cover how to install skins, first note that skins will only work on the version of the game they are designed for (so FM19 skins will only work with FM19 and not FM18) and Touch and Full Mode skins aren't compatible so if you are using the Touch version you will only be able to use Touch skins.
After you have downloaded a file it will generally come in one of three formats: zip, rar or 7z file.
Zip files should be automatically supported by your OS and may show up as compressed folders, Rar and 7z files may require you to download some software to extract the files, the below software is reccommended:
Windows: 7-Zip (Choose the most recent .exe)
MacOS: The Unarchiver
Linux: If you are using Linux hopefully you know how to download and locate programs for Linux already.
7-Zip is installed using the .exe you download, following the instructions on-screen. To install The Unarchiver simply double click on the .zip file you download from their website then drag the program it extracts (called 'The Unarchiver') into your apps folder.
Once installed, create a new folder somewhere you can keep track of (on your desktop for instance) and place your downloaded graphics zip, rar or 7z in it. Now we extract:
Windows: Right click on your zip, rar or 7z. Choose 7-Zip from the menu, then select 'Extract Here'.
MacOS X: Right click (or ctrl + click) on your zip, rar or 7z. Choose 'open with' then select 'The Unarchiver'.
Your file should extract and most probably create a folder in the same directory.
If you extracted an fmf file (or just straight downloaded one) this isn't a problem, these are just files that have been packed using the FM Resource Tool, and as an end user there is no need for you to mess around extracting these files, just think of these as the same as the folder you'd get from extracting the files.
Locating Your User Data Location
Once you have downloaded and extracted your files, you now need to move them over to your User Data Location so they can be read by the game.
First make sure you have run the game at least once (just getting to the start menu and exiting is fine) so the game can create the required folders for you.
The default location of your User Data Location will be slightly different depending on the OS you are using;
Windows
C:\Users\<username>\Documents\Sports Interactive\
C:\Users\<username>\Documents\Sports Interactive\
Mac OS X
/Users/<username>/Documents/Sports Interactive/
/Users/<username>/Documents/Sports Interactive/
Linux
/home/documents/Sports Interactive/
/home/documents/Sports Interactive/
(Replacing <username> with the name of the user account that you use on that computer)
If you want to move or have already moved your User Data Location then please refer to this thread to move/relocate it.
Once you have located the Sports Interactive folder you should see that it contains folders for every version of Football Manager you have run on that computer, so open the folder that corresponds to the version of FM you are using.
NOTE: Since FM17 the Touch Version has it's own folders so if using that version you'll want the Touch folder, for older versions of Touch it just used the same folder as the main game.
After you have opened the correct Football Manager folder you should see a list of folders and what you need to do is locate the folder called skins, if this folder doesn't exist then just create a new folder and call it skins.
Now open up your skins folder and place the files you extracted inside it.
If it is an fmf file you have downloaded then just place this file directly inside the skins folder.
If you have a folder after extracting the files then you need to make sure you are copying over the correct folder because if the skin files are nested inside another folder they will not work.
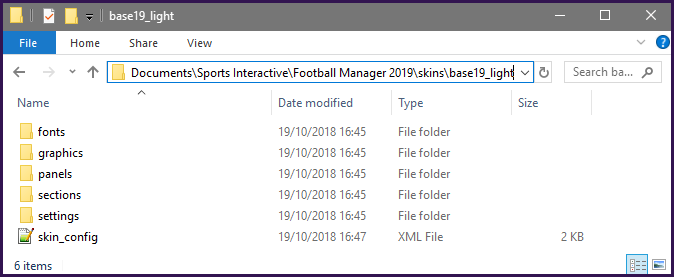
So you need to open the folders you extracted until you find a folder that is laid out like this with the skin_config file present;
If you want to move or have already moved your User Data Location then please refer to this thread to move/relocate it.
Once you have located the Sports Interactive folder you should see that it contains folders for every version of Football Manager you have run on that computer, so open the folder that corresponds to the version of FM you are using.
NOTE: Since FM17 the Touch Version has it's own folders so if using that version you'll want the Touch folder, for older versions of Touch it just used the same folder as the main game.
After you have opened the correct Football Manager folder you should see a list of folders and what you need to do is locate the folder called skins, if this folder doesn't exist then just create a new folder and call it skins.
Now open up your skins folder and place the files you extracted inside it.
If it is an fmf file you have downloaded then just place this file directly inside the skins folder.
If you have a folder after extracting the files then you need to make sure you are copying over the correct folder because if the skin files are nested inside another folder they will not work.
So you need to open the folders you extracted until you find a folder that is laid out like this with the skin_config file present;
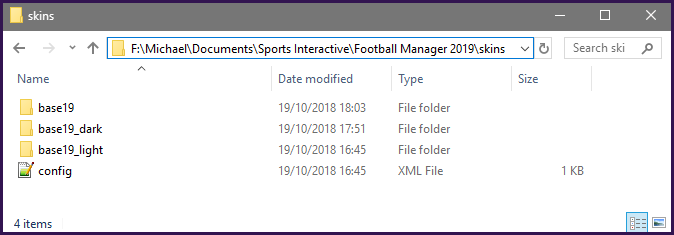
You then want to grab the parent folder to this (base19_light in this example) and copy this into your skins folder, if done correctly it should look like this:
Displaying Skins in-game
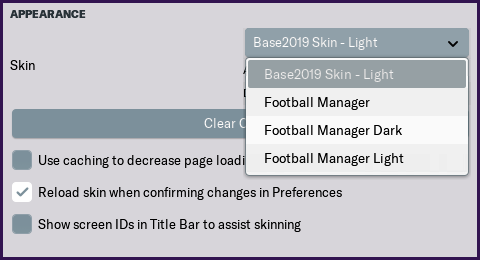
Skins: To select the skin in game you will need to load the game, and go into the Preferences menu and on the left panel in the middle you should have an option called Skin with a drop-down menu next to it.
If you select the drop-down menu it should list all of the skins you have installed, if the skin you want is listed then just select it and press the Confirm button to load it.
If the skin you want isn't showing then go to the Preferences -> Interface menu and at the bottom left you'll see another drop-down menu to select your skin from, below this menu untick 'Use Caching to decrease page loading times' and tick 'Reload Skin when confirming changes in Preferences' then select Confirm. This should then take you out of the Preferences menu but if you re-enter it should have refreshed the list of skins and your skin should now be in the above list.
If done right the screen should look like this:
Once the skin is loaded you can turn the skin cache back on and un-tick the Always Reload button.
How to Transfer Files from a Previous Version
Please note that skins are not transferable between versions, skins can only be used for the version of the game they were made for. It may seem that a skin from last year may initially work on the new game, however when you get to a new screen you are likely to get a broken/blank screen at best or even possibly you'll cause the game to crash, so it is best to wait for the skin maker to update the skin (or make your own with permission).
Redistribution Terms
You are free to post this content to your website provided:
1. It is not sold or behind a paywall.
2. You don't advertise it as being exclusive to your website.
3. My username and blog address are included: http://michaeltmurrayuk.blogspot.co.uk
If you have any questions then the best place to ask them is in the Skinning Forums at the Official SIGames Forums where I can be found most days.
If you like my work then feel free to send me a donation this is completely optional all of my content is and will always be free to access.